DIY Hockey is a place for this beginner to collect information and ideas from all over the internet into one place. This is stuff I use as I work and play to get better, and hopefully you'll find something useful for yourself here too.
I've mentioned a few times that my granddaughter and I came up with a checklist to help us improve our game. It's kind of a mish-mash of things, but important enough to need reminders.
The first five are fundamental skills that you want to make habits.
Hold the stick correctly.
Hockey stance.
Hands out in front of the body.
Bottom hand loose and slides when needed.
Top hand controls the stick. Rotate the wrist.
The next one is simple, but oh, so important.
Tap the stick one-handed to build hand, wrist and forearm strength.
Drills can be frustrating at first, but keep practicing and you will get better fast. Be creative!
Ball or puck at the heel of the stick when stickhandling, for better control.
Drill: Around two pucks, then figure 8's. Clockwise and counter-clockwise.
Drill: Stickhandle around the body: forehand, backhand, out front, in close, out wide, behind, etc.
These last two items are things to work on regularly. They're important and will give you an edge on the ice.
Saucer passing.
Elevating the puck when shooting.
So that's our list. What would you do different? What did I miss? Let me know in the comments, and thanks for your feedback.
1. The ability to move quickly and easily.
2. The ability to think and understand quickly.
So there's physical agility and mental agility. We're going to talk about the physical side here.
There are lots of agility drills out on the internet. The "Five Spot" (AKA Five Dot) drill is one that I've seen used by hockey coaches and players. To do the drills, you'll need to lay out the following pattern.
You can buy mats or carpets with the dots already there, or you can use chalk outside, or even bits of tape indoors. The diagram below shows the standard layout, but for younger, smaller players, you can shrink it to fit their size (slightly wider than shoulder width). Ideally, the spots should be four or five inches across.
So how do you use this pattern?
This .pdf page lays out the drills and time goals for the drills. Clicking that link will open a file you can download for reference.
Here's an excellent video showing each exercise in action.
A while back I posted about buying a bunch of PVC at the local hardware store. I got three ten-foot lengths of 3/4" pipe, a ten-pack of "T" joints, a ten-pack of 90 degree elbows, and four 45 degree elbows. Total cost was not quite twenty five dollars.
So let's look to see what kind of hockey training aids I made for that investment.
My first project was a DIY Dangler. The photo below shows the final pair I built, and next time I go to the hardware store I'll pick up another "T" so I can turn these two into a single piece twice as long - when I want to.
After the danglers, I tried a couple versions of a simple backstop so I could practice snap shots and saucer passing indoors without having pucks bouncing and ricocheting all over the room. Below is the current version, which uses a beach towel draped over the frame. So far, this is working well. More details can be found here.
Next up was a mini-goal that I set in front of the above backstop. I haven't done anything more than put the frame together for now, but it still provides a nice target when shooting or saucer passing. There's no post about this one yet, but the idea is simple, use 90 degree elbows to connect 18" lengths of PVC pipe together into a sturdy unit. The two pipes leading back from the base don't have to be 18" long, use what you have or what length would fit best for your setup.
Lastly, I put together this DIY version of a Fast Hands stickhandling training aid, using the awesome instructions by Mark Ivan.
Right now, everything is just press-fit together, and only the danglers are painted. I already have PVC solvent from a previous project, so that wasn't included in the original cost. Same for the spray paint.
As always, a reminder that all the cool toys in the world won't make you a better hockey player, if you don't use them. Put in the work, and have fun doing it!
The Farmer's Walk is a very simple exercise that will make your hands and forearms stronger.
The idea is simple. Grab something heavy in each hand and walk as far as you can with it, until you have to set it down. For instance, an adult could carry a couple of 5 gallon buckets full of sand or water. If that's too much, try a cinder block or brick in each hand. For a youngster, big cans of soup, small dumbbells or even large books would work. It's easy to tailor the weight to something you can handle for 30 seconds or so, but heavy enough that at the end you really want to put it down.
Rest for a minute or so, then turn around, pick up the weights again, and walk back to where you started.
Farmer's Walks are great for your forearms too, and your back... actually, it pretty darn good for your entire body.
So far, a lot of what I've posted has been about stickhandling. The reason for that is simple, stickhandling is what I concentrated on the most when first starting out, mainly because it's a fundamental skill that I could practice at home.
Whether it's the strengthening exercises I've talked about, or the cool little toys that help keep practice fun (and I love the cool little toys), the primary emphasis has been on that basic skill. To work on skating - and you should - you need ice time. For shooting, you need some sort of goal or backstop. For practicing your stickwork, you only need a stick and a ball or puck.
So yeah, we'll be branching out here soon enough. I'll talk about some apps I've tried and like, and some store-bought training aids that I think are worth the money. I'm just getting serious about shooting, so look for more about that too.
The Fast Hands Stickhandling Training Aid is very cool and allows a lot of creativity and variety as you practice. In the video below, Mark Ivan shows how you can build your own version using 3/4" PVC. His instructions are clear and simple, and you'll see step by step how to proceed.
I sat in my living room with a PVC cutter and parts, and created my own (just slip fit for now) in about a half hour. Time well spent.
Mark gives all dimensions in the video, but here it is all listed out. All the pieces are 3/4" PVC.
1 - 12" long
2 - 11" long
2 - 10" long
6 - 3 1/2" long
4 - 1" long
Primer and solvent (optional)
Spray paint (optional)
A note about the primer and solvent, you'll find that you don't need much, so buying a can of each will give you enough for many, many projects.
Here's a great video showing you twenty five different drills you can do with your new training aid, and each drill is shown at full speed, then slowed down so you can see what's going on. One thing to remember is that you don't have to stand still in front of it. Try standing to one side or the other as you practice. Move around it as you move the puck. You can also pop the puck or ball over the top of the bar, so you can get used to thinking in 3D as you stickhandle.
Each flat side is numbered, with 1 on the left, going to 5 on the right. This becomes helpful when you write down your favorite drills, so you can note which openings you're using. I can see this becoming a kind of "HORSE" game with stickhandling sequences instead of shooting too. Think Simon with a puck instead of flashing lights.
Finally, here's a video with stickhandling wiz Pavel Barber. He stresses creativity and getting out of your comfort zone as you practice for maximum benefit. The key here is not trying to go too fast for your skill level. Speed will come as you improve, so don't frustrate yourself needlessly by trying to do too much too soon.
This simple piece of exercise equipment will really give your wrists and forearms a workout. Known as a Forearm Roll, you might be able to make your own with stuff you already have in your garage or shop.
If not, the materials are simple and cheap. Get a 24" length of closet dowel or 1" PVC pipe. It doesn't have to be exactly 24", but don't go too much shorter than that. For a youngster, a leftover piece of that 3/4" PVC we've been using for other DIY projects will work great (use the thick wall schedule 40 type).
Tie a length of clothesline or thin rope to the dowel. Paracord works well too. The rope should be long enough to reach the floor when you hold your arms straight out in front of you. Make the knot tight enough so that it doesn't slide around the dowel as you try to roll it up. A strip of duct tape over the knot helps here.
On the other end of the rope, tie a weight of some kind. You can use a dumbbell, a small bag full of sand, or a weight set plate like in the picture above. Be creative if you have to, what the item is isn't really important. Again, for the youngsters you can try a mesh bag that onions or oranges come in, filled with a can or two from the pantry.
To use, stand straight up and hold the dowel in both hands with your arms extended straight out in front you you. Now, start to roll up the rope by turning the dowel in your hands. As the dowel turns, it will take up the rope, which in turn will lift up the weight.
When you get to the top, turn the dowel in the opposite direction to lower the weight back to the floor. Repeat two or three times.
This exercise really works the forearms. Don't try to go too heavy with the weight, try something relatively light at first.
Not long ago I posted about a quick and dirty shooting backstop that I put together. It worked great, but at the same time, it was more like a "first draft" because of the way I used bits and pieces laying around the shop to put it together.
Here's version 2. It looks better, is easier to set up and take down, and is a little more stable as well.
The first difference is that I replaced the two bath towels with a single heavy beach towel. After playing with different ways of attaching it to the frame, I found that just draping it over the top bar worked well enough. Even better, this made it much easier to take apart and store when not being used.
The second difference is the frame. It's still made of 3/4" PVC pipe. The two uprights and top crossbar are each 36" long, connected by 90 degree elbows. The uprights end in a "T" joint. The rear legs are 18" long (you could probably go a little shorter), and the front legs are 4" long.
Everything is just press-fit together.
I'm going to use this for a few days and see how it works out.
You don't need a bunch of pucks to practice shooting with. One single puck is enough. But, after every shot you have to retrieve the puck. So while you don't NEED a bunch of pucks, it sure is nice to have more.
Just for fun, here's a shot looking into my milk crate full of pucks. There's about 50 in there, along with a FlyPuck, two Green Biscuits and two Snipes.
If you're in a sporting goods store, pick up a puck or two. If you're at your local rink, stop in the shop and get a few (helps to support them too). You can get pucks by the dozen on Amazon. I pick up a dozen once in a while when they're on sale for about fifteen bucks.
You don't have to break the bank, and you don't need to get a bunch all at once.
BUT, if you can get a bunch all at once (Santa? Are you listening?)...
Regular ol' hockey pucks cost about a dollar in Canada. In the US, you can expect to pay a dollar and a half or more, depending on how many you buy all at once.
And then there are these amazing deals from PatriotPuck. First off, shipping is free. Always. A box of 25 pucks costs $24.99. Best price around, but it gets better. Buy a box of 50 and you pay $38.99, and a box of 100 is 77.95. That's pretty amazing.
So, do you need 100 pucks? Nope. Do I recommend getting more than just a few? Absolutely. You see my crate o' pucks above. I'm putting in an order for another 50, and my granddaughter might find a box of 25 under the Christmas tree.
Happy Thanksgiving everyone. Personally, I'm thankful that at my age, I'm still healthy enough to be learning something new and fun like hockey.
My gift to you: On YouTube, there's a channel called The Hockey Guy. He's a serious hockey fan, and covers the entire league rather than focusing on just a team or two. Smart, insightful and funny, he also manages to put out two or three excellent videos every day.
I built the one described in the video, and as he suggests in the video comments, I made mine three feet long instead of four. Honestly, this takes about twenty minutes to build, start to finish.
This works great.
Details: I used a 3 foot long length of particle board and a 40" long bungee strap.
I used the fat, wide bungees he mentions in the first comment on the video, but they're now unavailable. So for my next one (to be built), I bought these "Highland Fat Strap Bungee Cords 4-Pack - 30" and 40" from Amazon.
They're made by the same company. Prime shipping, and only $7.99 for the set. I do plan on making another one soon.
If you're worried about the bolts chewing up your floor or carpet, you can get non-slip material and put pieces under the legs. The plastic dip for tool handles might work too.
Here are some videos I found on YouTube showing different techniques and drills for stickhandling. I re-watch these occasionally as a refresher, and to remind myself to focus, because I will get better if I put in the work.
I'll be adding to this set over time, so check back and scroll down to see what's new.
This exercise is one you can do pretty much any time you have a few minutes to spare. Wrap a thick rubber band around your fingers, then extend your fingers to stretch the rubber band.
This is a very effective way to strengthen the muscles of your hand.
I have a mini-goal that I use to practice sauce passes and snap shots in my basement, kind of like the Hockey Sauce kit (instructions to come in the near future), and I needed a backstop for it. Since it's only one foot square, it's easy to miss. I did have a piece of hardboard behind it, but pucks would just bounce off of it and rebound all over the place. What I needed was something to soften the bounce when the puck missed.
I cut three three-foot long pieces of 3/4" PVC pipe and connected them with 90 degree elbows into an upside down "U" shape. At the bottom of the "U", I put two more 90 degree elbows and connected one foot long pieces of PVC to give it a little stability.
I set it into place, then put the hardboard backstop on top of the legs. Then I took two old bath towels and wrapped them over the crossbar so they draped down to the ground. I used some clothespins to hold the towels in place. Like I said, very improv.
It works pretty well. Any pucks that missed the goal hit the towels. Mostly they were deadened and fell right to the ground, but occasionally they'd hit straight on and thump the hardboard backing.
I need to come up with a simple, cheap way to replace the clothespins... hmmm... sew a pocket along the top and down each side to slip over the frame? Maybe.
I like the towels because they're heavy and should be durable. A piece of plastic tarp would probably work too, but be a bit noisier. More netting would work too, but I don't have a piece that large and the towels were free.
If you try this, let me know how it works for you. If you have a better way, let me know!
Remember the commercially available stickhandling training aids I talked about before? Well, here's the first set of instructions on how to make your own. I'm going to use 3/4" PVC pipe for mine, but there are numerous YouTube videos out there showing you how to make versions out of wood, broken hockey sticks, old pucks, and more. In fact, my first set (that I still use) are made of scrap wood and a dowel bought at Wally World or any craft store. I describe it in detail, and how to build one in another post here on DIY Hockey.
If you only have 90 degree elbows laying around, you can make a usable version, as shown in this picture. It's kind of easy to tip over though because of the design of the legs. It's simple to improve on it.
First, replace the bottom 90 degree elbow with a "T" joint, and by adding short legs on each side the stability is much better. Here's a photo of one of the "T" legs, painted but not attached.
The picture is rotated, sorry about that. The short white piece at the top is a 1" long piece of PVC pipe, and the two side legs are 3" long pieces of the same. I've found that by using the 1" length connector between the "T" and the 90 degree elbow above, you have enough room for a stickhandling ball to pass beneath. Perfect.
One bonus is that by making several of the "T" foot sections, I could configure this pretty much any way I could imagine. Add a "T" joint to the end of the crossbar, and you can add another straight piece, like so.
You can also vary the length of the top bar to change the difficulty of drills with the dangler. Watch the video below to see what I mean.
Instead of a "T" joint, you could add 45 or 90 degree elbows to create a V or U shaped dangler.
You can use PVC adhesive to permanently fix the feet and just press fit everything else together, or you could treat everything like one giant tinkertoy set and build to suit. It takes seconds, and is light enough that a small bag could carry a lot of pieces to use.
I still recommend the cheap spray paint though. Because spray paint. I went to WalMart this morning and looked through their paint section. They were out of the red, so I got two cans of flat black for less than a dollar each. Here's what my PVC danglers look like after a coat of paint, I think they look pretty good.
Here's a video showing some nice drills you can do with a "dangler" stickhandling aid.
When my granddaughter was taking the Power Skating class, they carried their sticks with them the entire time. The idea is that you get used to always having the stick in your hands as you move on the ice.
Likewise, when you're practicing stickhandling or other skills at home, you can wear your hockey gloves (if you have them). Practicing bare handed is good, but getting used to the gloves is better.
There are numerous YouTube videos out there showing you how to make versions out of wood, broken hockey sticks, old pucks, and more. My first set (that I still use) are made of scrap wood and a dowel bought at Wally World or any craft store.
To start out, I bought a 1/2" diameter dowel that was three feet long at the store. I found some scrap wood in my shop, and cut out four rectangles that were four inches tall by three inches wide. I drilled 1/2" holes in two of the rectangles, and 5/8" holes in the other two. Finally, I slid the two rectangles with the larger holes onto the dowel, and then fit the two rectangles with the 1/2" holes on the ends of the dowel. I used a little wood glue, then drove a drywall screw through the wood of the rectangle and into the dowel to secure it.
The result was a three foot long bar that was just tall enough for a stickhandling ball to pass under, with two inner movable "feet" that could be positioned anywhere along the length of the dowel.
I bought a cheap can of red spray paint and I was ready to have some fun.
There were a couple of things that I didn't care for though. First, instead of rectangles, I wish I'd have made the bottoms wider to make it harder to tip over when I accidentally hit the bar with my stick. I also found the three foot length rather awkward to carry around.
What I wound up doing was to cut the dowel into three pieces, making the two ends each 15" long, then I permanently fastened the two movable rectangles to the ends. This way I had two 15" bars to use. I could practice with one, or set two up however I wanted, like an "L" shape, or a "V", or even in a line. Having the two smaller ones offered more flexibility.
The red paint is a little chewed up from the formerly movable legs, but I can touch that up if it bothers me (it doesn't).
It doesn't matter what design you use, or what materials you make it out of. What matters is that you use it regularly. Practice every day, even if it's only a few minutes
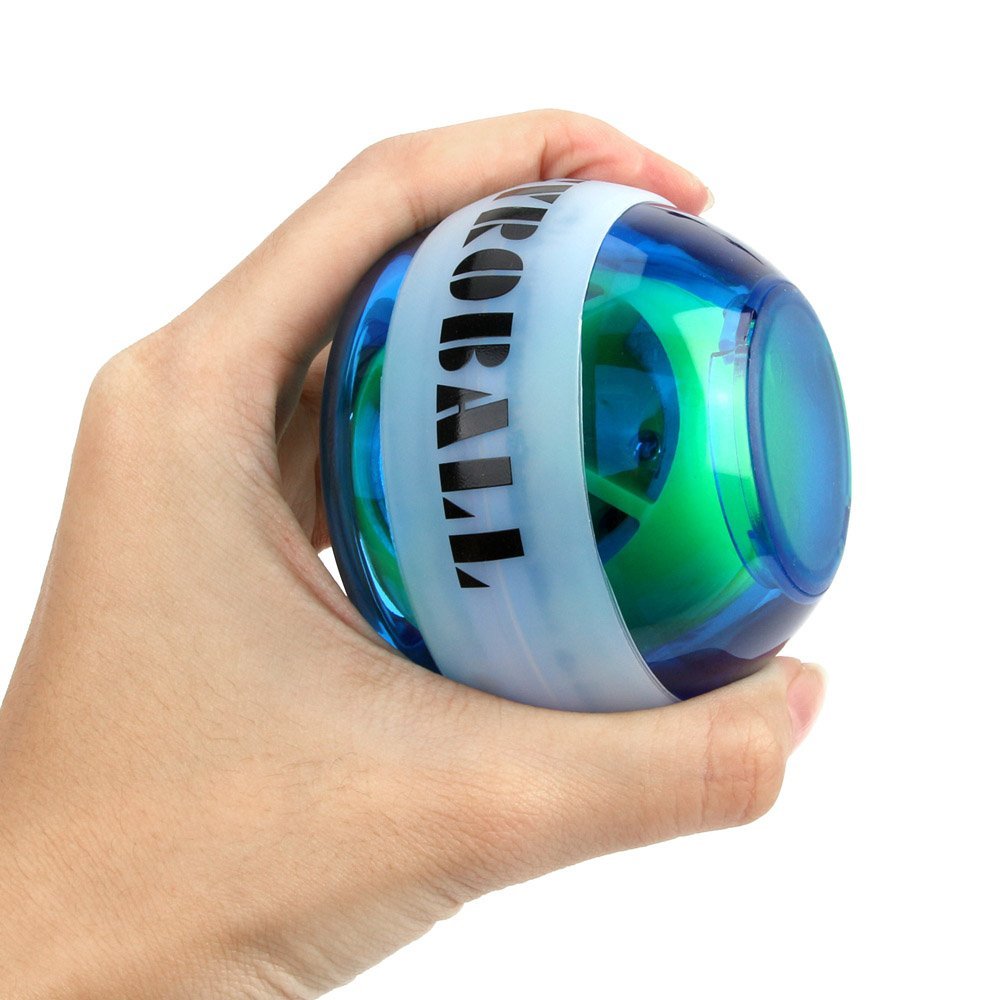
I'm not sure whether this qualifies as a toy or a genuine piece of exercise equipment. I bought this Power Ball Gyro Exerciser on Amazon for less than $15.00.
The idea is simple, inside the hard plastic outer shell is a gyroscope (the yellow ball with the groove in the picture). You get the gyroscope spinning, and then hold on to the outer shell. They gyro creates momentum that tries to force the ball into motion, and as you hold the ball, your grip resists that force. This works your small muscles.
It does seem to work, at least as far as tiring out your muscles. Getting the gyro revved up and then holding the ball still takes some effort. When I'm done with a "workout" I can definitely feel it.
I bought a stripped down model. You can get some that light up and have an LED screen mounted to tell you the RPMs that the gyro is doing. The way mine works is that you tuck a string (included) into the slot on the gyro, and pull start it like a lawnmower. Once you get it spinning, you start to make a rocking motion with your hand to rev the gyro up even more. Once it's going good - and you can tell - then you can just hold the ball and fight the centrifugal forces. I find that I'm much better at keeping it going, and revving it faster, with my dominant hand (right, in my case).
This thing isn't benignly harmless, you have to pay attention while using it. There's some heft to it and the entire unit is trying to move when you've got it going. In addition, I was inattentive once and managed to touch my forearm skin to the spinning gyro (clumsy and not paying attention... it's a gift I have). It pinched off a thin layer of my skin about a half inch long and eighth of an inch wide. Left a visible scar when it healed.
This thing is fun and kind of cool to play with, and it might actually be beneficial when it comes to building up your strength, but it doesn't do anything that you can't do with other exercises. There's a lot of hype on the internet about powerballs, and unsurprisingly, some of the most glowing reviews come from sites that sell them.
As I usually try to do, here's a video showing the powerball in use. Note that he starts the gyro with his thumb and rocking his hand. I've not been able to do that, but the string works just fine for me.
If you give it a try, or have used it before, let me know in the comments. Did it work for you?
This video has more excellent, simple exercises to improve the strength in your hands, wrists and forearms. Doing these will definitely help your game.
If you don't have an appropriate weight to use, try something like a soup can (for the little ones) or even a heavy book. It shouldn't be so heavy that it's awkward.
There are some really nice stickhandling training tools out on the market. Sweet Hands, Extreme Dangler, My Enemy Pro, XDeviator, and many more. I like toys and gadgets, so I wish I could get them all. Unfortunately, I'm not made out of money, and some of these are really pricey.
Luckily for me (and you), these are all the same thing in concept, and we can easily make our own for a fraction of the price. It might not be as pretty or as versatile, but just like the commercial ones, just owning it isn't going to make you better. You have to do the stick drills using them.
There are also things like Attack Triangles and other goodies that we'll worry about in another post.
Now, to be sure, none of these are essential. You can do the exact same stickhandling practice with mini-cones or even extra pucks spaced out. The primary advantage these have is that it forces you to lift your stick over the device as you move from side to side, as if you were stickhandling around someone's stick who's trying to defend.
In the near future we'll look at several different ways to build these at home. In the meantime, you can look at the above examples for inspiration.